1<!-- Add a div to house your 2 postcode input field --> 3<div id="lookup_field"></div> 4 5<!-- This is your existing form --> 6<label>Address Line One</label> 7<input id="first_line" type="text" /> 8 9<label>Address Line Two</label> 10<input id="second_line" type="text" /> 11 12<label>Address Line Three</label> 13<input id="third_line" type="text" /> 14 15<label>Post Town</label> 16<input id="post_town" type="text" /> 17 18<label>Postcode</label> 19<input id="postcode" type="text" />
1<script> 2// Add this after your form 3$('#lookup_field').setupPostcodeLookup({ 4 // Add your API key 5 api_key: 'ak_htaapr1fkpQCzbA66WHfMRAIjotF5', 6 // Identify your fields with CSS selectors 7 output_fields: { 8 line_1: '#first_line', 9 line_2: '#second_line', 10 line_3: '#third_line', 11 post_town: '#post_town', 12 postcode: '#postcode' 13 } 14}); 15</script>
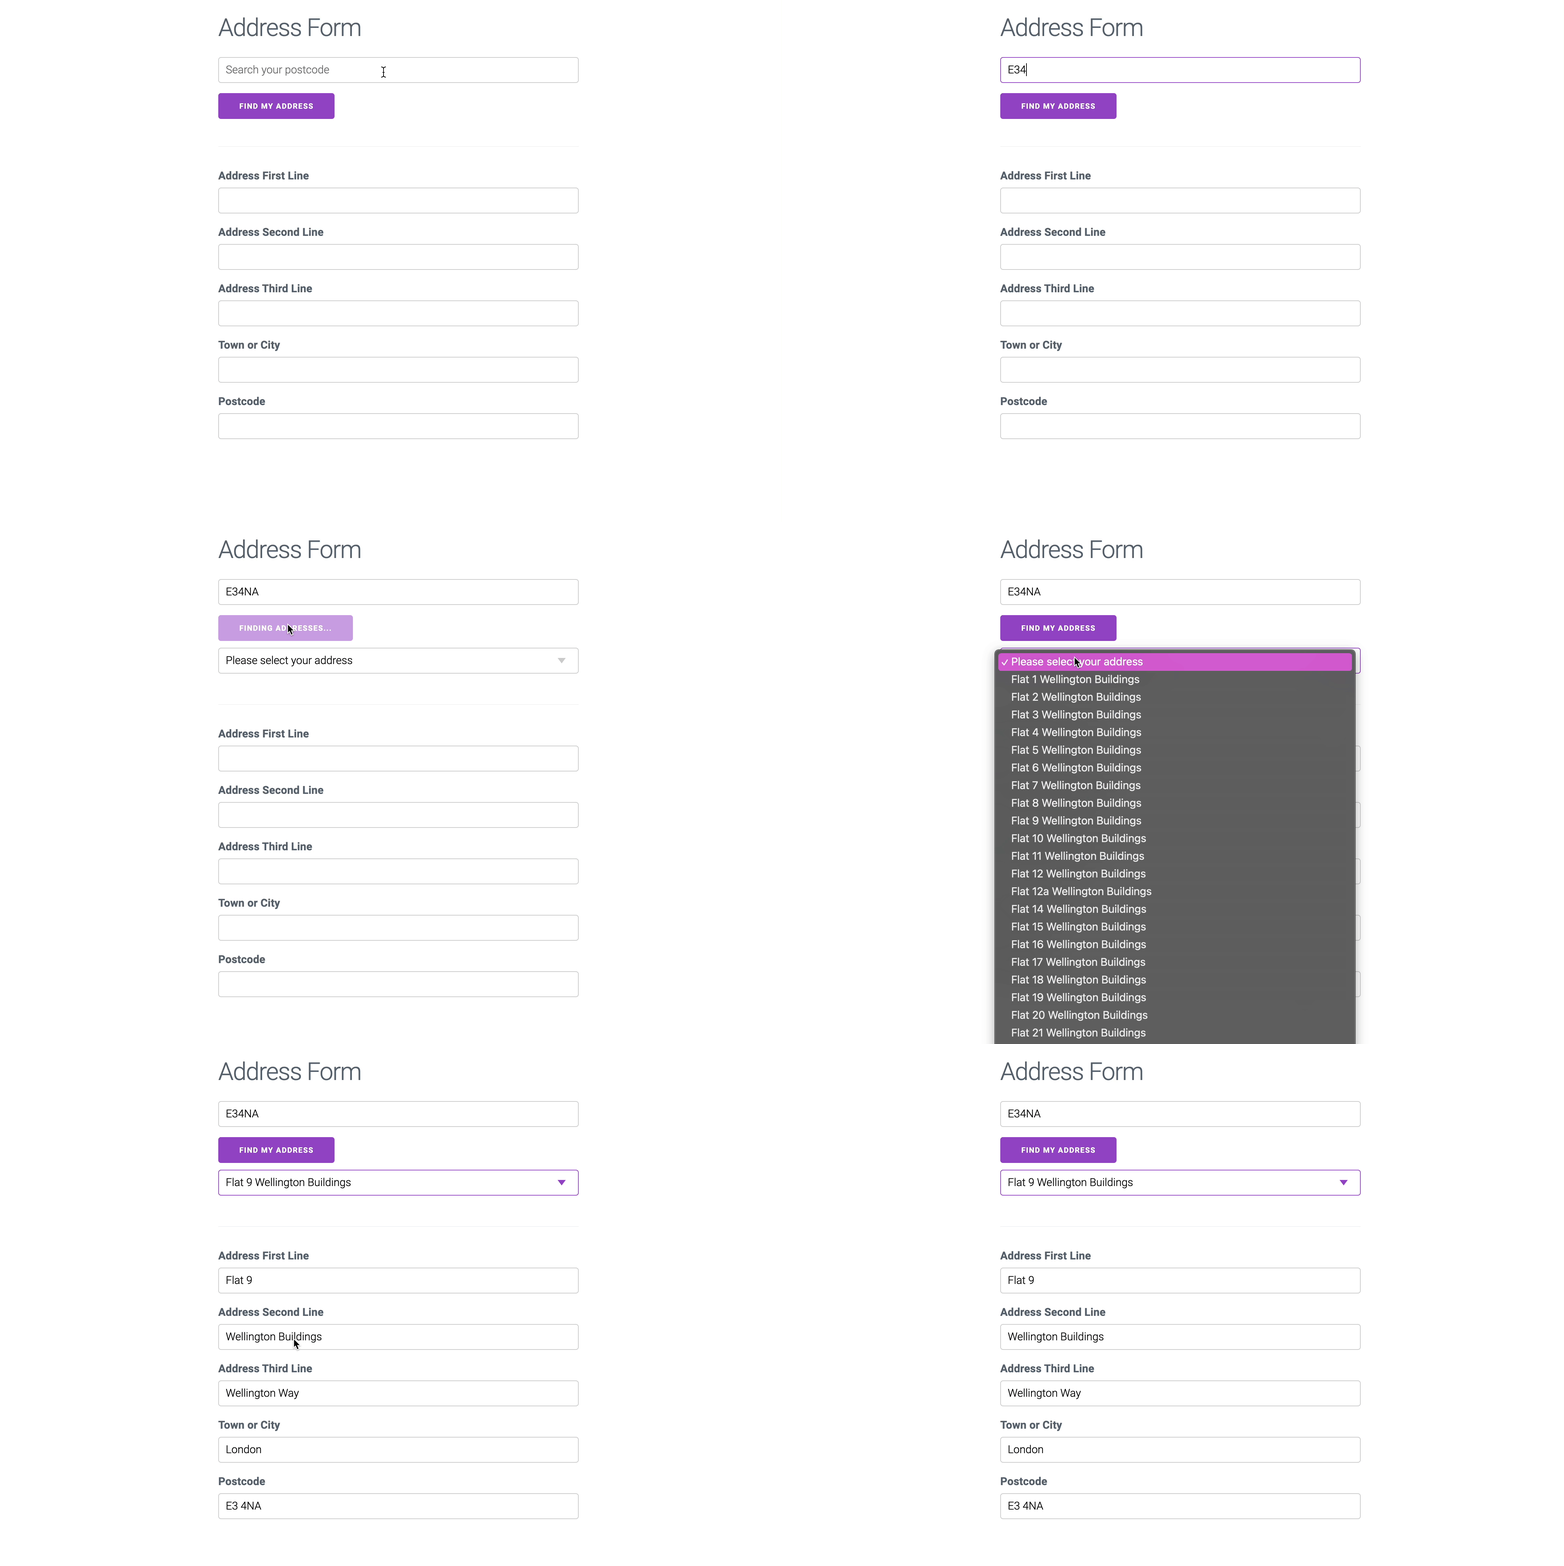
In a typical address form, you have an existing set of address fields you wish to populate with accurate user data.
To use the plugin, load the script, pass in your API Key and CSS selectors to identify your existing address fields.
As long as the CSS selector identifies the relevant field uniquely, it will not matter if the selector references the element's ID, class or name.
1$('#lookup_field').setupPostcodeLookup({ 2 api_key: 'iddqd', 3 output_fields: { 4 line_1: '#first_line', 5 line_2: '#second_line', 6 line_3: '#third_line', 7 post_town: '#post_town', 8 postcode: '#postcode' 9 } 10}); 11 12//$.fn.setupPostcodeLookup() creates the necessary 13// lookup elements (input field and lookup button) 14// in specified element (in this case, the empty div 15// tag with id='lookup_field')
1<div id="lookup_field"></div> 2<!-- The above empty div tag will allow the 3 plugin to create the lookup fields --> 4 5<!-- Below are your existing input fields --> 6<label>Address Line One</label> 7<input id="first_line" type="text"> 8 9<label>Address Line Two</label> 10<input id="second_line" type="text"> 11 12<label>Address Line Three</label> 13<input id="third_line" type="text"> 14 15<label>Post Town</label> 16<input id="post_town" type="text"> 17 18<label>Postcode</label> 19<input id="postcode" type="text">
We can also pull in more data from the Postcode Address File by passing more arguments into the "output_fields" object.
In this instance, we pull location, organisation name (if any) and the Unique Delivery Point Reference Number.
You can access the full list of available data fields.
Try a postcode with lots of local businesses like NW1 0BG.
1$('#lookup_field').setupPostcodeLookup({ 2 api_key: 'iddqd', 3 output_fields: { 4 line_1: '#first_line', 5 line_2: '#second_line', 6 line_3: '#third_line', 7 post_town: '#post_town', 8 postcode: '#postcode', 9 organisation_name: '#organisation_name', 10 longitude: '#longitude', 11 latitude: '#latitude', 12 udprn: '#udprn', 13 uprn: '#uprn' 14 } 15}); 16 17// Note the new properties passed into output_fields 18// along with their associated CSS selectors
1<div id="lookup_field"></div> 2 3<!-- Let's add some new input fields below to house 4 the additional data points --> 5 6<label>Organisation Name</label> 7<input id="organisation_name" type="text"> 8<label>Longitude</label> 9<input id="longitude" type="text"> 10<label>Latitude</label> 11<input id="latitude" type="text"> 12<label>Unique Delivery Point Reference Number</label> 13<input id="udprn" type="text"> 14<label>Unique Property Reference Number</label> 15<input id="uprn" type="text"> 16 17 18<label>Address Line One</label> 19<input id="first_line" type="text"> 20<label>Address Line Two</label> 21<input id="second_line" type="text"> 22<label>Address Line Three</label> 23<input id="third_line" type="text"> 24<label>Post Town</label> 25<input id="post_town" type="text"> 26<label>Postcode</label> 27<input id="postcode" type="text">
The input field and buttons can be styled by declaring classes in the configuration object.
In this example the input and button classes have been set to my-input-class
and my-button-class
and styled using CSS.
1$('#lookup_field').setupPostcodeLookup({ 2 api_key: 'iddqd', 3 output_fields: { 4 line_1: '#first_line', 5 line_2: '#second_line', 6 line_3: '#third_line', 7 post_town: '#post_town', 8 postcode: '#postcode' 9 }, 10 button_class: 'my-button-class', 11 input_class: 'my-input-class' 12});
1<div id="lookup_field"></div> 2 3<label>Address Line One</label> 4<input id="first_line" type="text"> 5 6<label>Address Line Two</label> 7<input id="second_line" type="text"> 8 9<label>Address Line Three</label> 10<input id="third_line" type="text"> 11 12<label>Post Town</label> 13<input id="post_town" type="text"> 14 15<label>Postcode</label> 16<input id="postcode" type="text">
You can create multiple, independent Postcode Lookup fields on the same page. This is useful for certain requirements, e.g. separate billing and shipping addresses.
.setupPostcodeLookup()
can be invoked multiple times on different DOM elements to create multiple fields.
Each lookup field is independent and so can behave differently if you pass in different configuration settings.
1// Hooking up the first lookup field 2$('#lookup_field').setupPostcodeLookup({ 3 api_key: 'iddqd', 4 output_fields: { 5 line_1: '#first_line', 6 line_2: '#second_line', 7 line_3: '#third_line', 8 post_town: '#post_town', 9 postcode: '#postcode' 10 } 11}); 12 13// Hooking up the second lookup field 14$('#lookup_field_2').setupPostcodeLookup({ 15 api_key: 'iddqd', 16 output_fields: { 17 line_1: '#first_line_2', 18 line_2: '#second_line_2', 19 line_3: '#third_line_2', 20 post_town: '#post_town_2', 21 postcode: '#postcode_2' 22 } 23});
1<!-- First Lookup Field --> 2<div class="box"> 3 <h2>Lookup Field 1</h2> 4 <div id="lookup_field"></div> 5 6 <label>Address Line One</label> 7 <input id="first_line" type="text"> 8 9 <label>Address Line Two</label> 10 <input id="second_line" type="text"> 11 12 <label>Address Line Three</label> 13 <input id="third_line" type="text"> 14 15 <label>Post Town</label> 16 <input id="post_town" type="text"> 17 18 <label>Postcode</label> 19 <input id="postcode" type="text"> 20</div> 21 22<!-- Second Lookup Field --> 23<div class="box"> 24 <h2>Lookup Field 2</h2> 25 <div id="lookup_field_2"></div> 26 27 <label>Address Line One</label> 28 <input id="first_line_2" type="text"> 29 30 <label>Address Line Two</label> 31 <input id="second_line_2" type="text"> 32 33 <label>Address Line Three</label> 34 <input id="third_line_2" type="text"> 35 36 <label>Post Town</label> 37 <input id="post_town_2" type="text"> 38 39 <label>Postcode</label> 40 <input id="postcode_2" type="text"> 41</div>
You may not want the plugin to create its own postcode input field. Instead, you may wish to use an existing field.
The plugin allows you to define a pre-existing element to accept inputs for your postcode lookup. The only proviso is that the element is able to respond to $.fn.val()
. For instance <input>
, <textarea>
or <select>
would suffice.
To enable this behaviour simply identify your custom input with CSS selectors, via the input
property.
1$('#lookup_field').setupPostcodeLookup({ 2 api_key: 'iddqd', 3 output_fields: { 4 line_1: '#first_line', 5 line_2: '#second_line', 6 line_3: '#third_line', 7 post_town: '#post_town', 8 postcode: '#postcode' 9 }, 10 input: '#customInput' 11}); 12 13//Define an DOM element which you wish to serve as the input to the postcode lookup. This element will need to respond to $.fn.val in order to work. In otherwords, it should be an input, select or textarea.
1<!-- Below is the custom input field, we're using a textarea in this example --> 2 3<textarea id="customInput" type="text" value="This is my custom input element"> 4This is my custom input element. It can be an input, select or textarea element. 5</textarea> 6 7<div id="lookup_field"></div> 8 9<label>Address Line One</label> 10<input id="first_line" type="text"> 11 12<label>Address Line Two</label> 13<input id="second_line" type="text"> 14 15<label>Address Line Three</label> 16<input id="third_line" type="text"> 17 18<label>Post Town</label> 19<input id="post_town" type="text"> 20 21<label>Postcode</label> 22<input id="postcode" type="text">
You may also specify any clickable DOM element as a trigger to lookup a postcode.
Simply identify your custom input via the button
property using CSS selectors.
1$('#lookup_field').setupPostcodeLookup({ 2 api_key: 'iddqd', 3 output_fields: { 4 line_1: '#first_line', 5 line_2: '#second_line', 6 line_3: '#third_line', 7 post_town: '#post_town', 8 postcode: '#postcode' 9 }, 10 button: '#customButton' 11}); 12 13//Define the button parameter with the id of your custom DOM element. This element will trigger a Postcode Lookup when clicked.
1<div id="lookup_field"></div> 2 3<!-- Here we've created a link to be used as a trigger for a Postcode Lookup --> 4 5<h3><a href="" id="customButton">My Custom Lookup Link</a></h3> 6 7<label>Address Line One</label> 8<input id="first_line" type="text"> 9 10<label>Address Line Two</label> 11<input id="second_line" type="text"> 12 13<label>Address Line Three</label> 14<input id="third_line" type="text"> 15 16<label>Post Town</label> 17<input id="post_town" type="text"> 18 19<label>Postcode</label> 20<input id="postcode" type="text">
If an organisation is registered at an address, clear addressing guidelines indicate that the organisation name should appear on the first line of the address (line_1
).
This may not be ideal for all use cases, however. For instance, you may want to collect the organisation name in a separate field.
By setting remove_organisation
to true
, the plugin will remove any organisation name from address lines.
1$('#lookup_field').setupPostcodeLookup({ 2 api_key: 'iddqd', 3 remove_organisation: true, 4 output_fields: { 5 organisation_name: "#organisation", 6 line_1: '#first_line', 7 line_2: '#second_line', 8 line_3: '#third_line', 9 post_town: '#post_town', 10 postcode: '#postcode' 11 } 12});
1<div id="lookup_field"></div> 2 3<label>Organisation</label> 4<input id="organisation" type="text"> 5 6<label>Address Line One</label> 7<input id="first_line" type="text"> 8 9<label>Address Line Two</label> 10<input id="second_line" type="text"> 11 12<label>Address Line Three</label> 13<input id="third_line" type="text"> 14 15<label>Post Town</label> 16<input id="post_town" type="text"> 17 18<label>Postcode</label> 19<input id="postcode" type="text">
For some applications, you may expect your key to not be usable in certain situations. For instance:
You can instruct the plugin to make provisions in case your key can't be used right there and then.
By setting check_key
to true
the plugin will check if the key is usable when it is loaded on a page. If the check fails, the plugin will not initialise.
You can also use the onLoaded
and onFailedCheck
callbacks to make further changes to your page depending on whether your key can be used.
1$('#lookup_field').setupPostcodeLookup({ 2 // Test key: "iddqd" passes the check 3 api_key: 'iddqd', 4 5 // Test key: "idkfa" fails the key check 6 // api_key: 'idkfa', 7 8 check_key: true, 9 10 // Invoked if plugin loads 11 onLoaded: function () { 12 $("#resultCheck").html("Try using our test postcode: ID1 1QD"); 13 }, 14 15 // Invoked if key fails check 16 onFailedCheck: function () { 17 $("#resultCheck").html("Please manually enter your address"); 18 }, 19 20 output_fields: { 21 line_1: '#first_line', 22 line_2: '#second_line', 23 line_3: '#third_line', 24 post_town: '#post_town', 25 postcode: '#postcode' 26 } 27});
1<p id="resultCheck"></p> 2 3<div id="lookup_field"></div> 4 5<label>Address Line One</label> 6<input id="first_line" type="text"> 7 8<label>Address Line Two</label> 9<input id="second_line" type="text"> 10 11<label>Address Line Three</label> 12<input id="third_line" type="text"> 13 14<label>Post Town</label> 15<input id="post_town" type="text"> 16 17<label>Postcode</label> 18<input id="postcode" type="text"> 19
You can also enable a full address search in case the postcode is partially or completely unknown.
Set address_search
to true
and the plugin will perform a full address search if the search term is not a valid postcode.
1<script> 2$('#lookup_field').setupPostcodeLookup({ 3 api_key: 'ak_htaapr1fkpQCzbA66WHfMRAIjotF5', 4 // Enable address search 5 address_search: true, 6 // Add a custom label 7 input_label: "Search for a postcode or address", 8 output_fields: { 9 line_1: '#first_line', 10 line_2: '#second_line', 11 line_3: '#third_line', 12 post_town: '#post_town', 13 postcode: '#postcode' 14 } 15}); 16</script>
1<div id="lookup_field"></div> 2 3<label>Address Line One</label> 4<input id="first_line" type="text"> 5 6<label>Address Line Two</label> 7<input id="second_line" type="text"> 8 9<label>Address Line Three</label> 10<input id="third_line" type="text"> 11 12<label>Post Town</label> 13<input id="post_town" type="text"> 14 15<label>Postcode</label> 16<input id="postcode" type="text">
By passing a function to onSearchCompleted
, you can execute a custom callback. onSearchCompleted
accepts a data
argument which represents the raw response body for your request.
This option is useful if you want to run custom code after the user has searched for an address and before the user selects from the dropdown menu.
1$('#lookup_field').setupPostcodeLookup({ 2 api_key: 'iddqd', 3 output_fields: { 4 line_1: '#first_line', 5 line_2: '#second_line', 6 line_3: '#third_line', 7 post_town: '#post_town', 8 postcode: '#postcode' 9 }, 10 onSearchCompleted: function (data) { 11 if (data.code === 2000) { 12 // Success 13 $("#successStatus") 14 .html("Success!"+ JSON.stringify(data,2,2)); 15 } else if (data.code === 4040) { 16 // Postcode does not exist 17 $("#successStatus") 18 .html("Postcode does not exist!"); 19 } else { 20 $("#successStatus") 21 .html("Some error occurred"); 22 } 23 } 24});
1<pre id="successStatus"></pre> 2 3<div id="lookup_field"></div> 4 5<label>Address Line One</label> 6<input id="first_line" type="text"> 7 8<label>Address Line Two</label> 9<input id="second_line" type="text"> 10 11<label>Address Line Three</label> 12<input id="third_line" type="text"> 13 14<label>Post Town</label> 15<input id="post_town" type="text"> 16 17<label>Postcode</label> 18<input id="postcode" type="text">
Instead of writing address attributes to specific input fields, you can also write out the entire address to a general input like a textarea
.
This is achieved by using the onAddressSelected
callback.
When an address is selected from the dropdown, combine the address fields and write it to an input field.
1$('#lookup_field').setupPostcodeLookup({ 2 api_key: 'iddqd', 3 output_fields: {}, 4 onAddressSelected: address => { 5 const result = [ 6 address.line_1, 7 address.line_2, 8 address.line_3, 9 address.post_town, 10 address.postcode, 11 ].filter(elem => elem !== "") 12 .join("\n"); 13 $("#output_field").html(result); 14 } 15}); 16
1<div id="lookup_field"></div> 2 3<label>Address</label> 4<textarea id="output_field"></textarea> 5
If you have any questions or need help debugging, come talk to us